easyAmber
A comprehensive toolbox to automate the molecular dynamics simulation of proteins
EasyAmber is a set of wrapper scripts to automate the molecular dynamics routines implemented in the Amber package. The toolbox can address a wide set of tasks in computational biology struggling to account for protein flexibility, and supports the full-atom model building, optimization/equilibration of the molecular system, classical/conventional and accelerated molecular dynamics simulations. The easyAmber software takes the molecular dynamics to the next level in terms of usability for complex processing of large volumes of data. It implements advanced MD protocols, but is highly automated and easy-to-operate to attract a broad audience. The toolbox can be used on a personal desktop station equipped with a gaming GPU-accelerator, as well as help to manage huge workloads on a powerful supercomputer.
The molecular dynamics is a very complex approach, and the general-purpose protocols implemented in our toolbox may require further customization to fit the particular research objective. We believe that any potential obstacles will be compensated by the overall simplicity of the use of the new software, thus promoting the value of molecular modeling among general biologists. We expect the easyAmber will contribute to a wide-spread implementation of the molecular dynamics at a daily laboratory routine, supporting a recent trend away from inefficient "static" approaches in protein sciences towards a deeper understanding of the dynamics in protein structures.
The software is freely available for download with no login requirement.
THIS WEB-SITE/WEB-SERVER/SOFTWARE IS PROVIDED “AS IS”, WITHOUT WARRANTY OF ANY KIND, EXPRESS OR IMPLIED, INCLUDING BUT NOT LIMITED TO THE WARRANTIES OF MERCHANTABILITY, FITNESS FOR A PARTICULAR PURPOSE AND NONINFRINGEMENT. IN NO EVENT SHALL THE AUTHORS OR COPYRIGHT HOLDERS OR HARDWARE OWNERS OR WEB-SITE/WEB-SERVER/SOFTWARE MAINTEINERS/ADMINISTRATORS BE LIABLE FOR ANY CLAIM, DAMAGES OR OTHER LIABILITY, WHETHER IN AN ACTION OF CONTRACT, TORT OR OTHERWISE, ARISING FROM, OUT OF OR IN CONNECTION WITH THE WEB-SITE/WEB-SERVER/SOFTWARE OR THE USE OR OTHER DEALINGS IN THE WEB-SITE/WEB-SERVER/SOFTWARE. PLEASE NOTE THAT OUR WEBSITE COLLECTS STANDARD APACHE2 LOGS, INCLUDING DATES, TIMES, IP ADDRESSES, AND SPECIFIC WEB ADDRESSES ACCESSED. THIS DATA IS STORED FOR APPROXIMATELY ONE YEAR FOR SECURITY AND ANALYTICAL PURPOSES. YOUR PRIVACY IS IMPORTANT TO US, AND WE USE THIS INFORMATION SOLELY FOR WEBSITE IMPROVEMENT AND PROTECTION AGAINST POTENTIAL THREATS. BY USING OUR SITE, YOU CONSENT TO THIS DATA COLLECTION.
Publications
Tutorial and step-by-step practical guide: Suplatov D., Sharapova Y., Švedas V. (2020) easyAmber: a comprehensive toolbox to automate the molecular dynamics simulation of proteins, J Bioinform Comput Biol., 18(6), 2040011 DOI:10.1142/S0219720020400119
Conference Poster: Suplatov D., Sharapova Y., Švedas V. (2020) easyAmber: a step away from inefficient ”static” approaches towards a deeper understanding of protein dynamics, BGRS/SB-2020: 12th International Multiconference “Bioinformatics of Genome Regulation and Structure/Systems Biology”, 06-10 July 2020, Novosibirsk, Russia [download]
- General information, License, Prerequisites
- Download section
- Supplementary technical documentation
- Acknowledgments
[to the top]
General information
The easyAmber is a set of three master-scripts to automate the configuration and execution of the MD routines provided by the Amber package, and several auxiliary scripts for data management. All programs are continuously updated to implement new functions and improve usability. The prerequisites and download links to files are provided below.
License
| easyAmber Copyright (C) 2019-2021 Suplatov D., Sharapova Y., Švedas V., This program is free software: you can redistribute it and/or modify it under the terms of the GNU General Public License as published by the Free Software Foundation, either version 3 of the License, or any later version. |
Prerequisites
The easyAmber toolbox is a supplement, not a replacement, for the Amber molecular modeling suite. The original Amber and AmberTools software packages have to be obtained and installed manually by the user prior to running the easyAmber. The $AMBERHOME environmental variable should point to the Amber+AmberTools installation folder, and will be probed by the easyAmber to validate the dependencies and binary files. The easyAmber toolbox is compatible with Amber v.16+ and AmberTools v.17+ (i.e., the older versions of AmberTools do not feature the FF15IPQ force-field).
In addition, the following open-source or freeware software should be installed for full compatibility:
- Open Babel Chemistry Toolbox (to assist the preparation of the full-atom models of low-molecular-weight compounds);
- PyMol Molecular Graphics System (to view and edit the PDB structures of proteins and ligands);
- Visual Molecular Dynamics (to view and analyze the molecular dynamics trajectories).
[to the top]
Download section
| Title | Role | Description | Version | Date | Link |
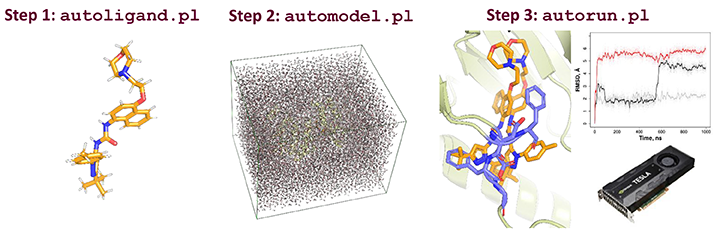
| autoligand.pl | Master | Assists the preparation of a draft version of Amber parameter files for a custom low-molecular-weight ligand | 2.0.2 | 2021-01-09 | [link] |
| automodel.pl | Master | Assists the preparation of the Amber parameter files for full-atom molecular system of a protein or a protein-ligand complex in a cubic water box | 2.0 | 2019-12-15 | [link] |
| autorun.pl | Master | Accommodates the seven-step MD simulation pipeline: the initial optimization of the molecular system (i.e., three-step energy minimization with water relaxation), heating (in the NVT ensemble), equilibration (in the NPT ensemble), followed by the classical/conventional MD (in the NVT ensemble), and optionally concluded by the accelerated MD simulation (in the NVT ensemble) | 2.1 | 2020-12-18 | [link] |
| pdbwat2amber.sh | Aux | Renames crystallographic solvent molecules according to the Amber naming scheme | 2.0 | 2019-12-15 | [link] |
| catnc.sh | Aux | Concatenate NetCDF trajectories of a crashed run into a single file | 2.0 | 2019-12-15 | [link] |
| stripWater.sh | Aux | Removes the solvent from the trajectories to reduce the file size and facilitate further expert analysis | 2.0 | 2019-12-15 | [link] |
| snapshot.sh | Aux | Converts the NetCDF binary trajectory into PDB snapshots | 2.0 | 2019-12-15 | [link] |
[to the top]
Supplementary technical documentation
The definitive guide to the easyAmber was published elsewhere (see "Publication and tutorial"). This on-line documentation is a supplement to the step-by-step practical guide provided in that paper.
- Fidelity of the initial protein 3D-structure
- Using the R.E.D. web-server to prepare ligand parameters
- Naming rules for files and folders with user-prepared ligand topologies compatible with
automodel.pl - Define new covalent bonds
- Define new atom types
- Load auxiliary force-fields
- Using
automodel.plwith polymer ligands - The
autorun.plprotocol fails on the step #2 - Running
autorun.plon a supercomputer
[return to toc]
Fidelity of the initial protein 3D-structure
Please note, that easyAmber is a set of tools to assist the molecular dynamics simulation starting from the protein/protein-ligand complex that has to be provided by the user. The easyAmber does not cover the construction of this initial molecular model. In most cases, the protein 3D-structures available in the PDB can be submitted to the MD straight ahead. However, sometimes PDB entries can be missing flexible loop regions, or implement ambiguous formatting (e.g., duplicate numbering of amino acid residues), etc. These minor errors have to be corrected using an appropriate molecular modeling software (e.g., Modeller) prior to running the easyAmber.
[return to toc]
Using the R.E.D. web-server to prepare ligand parameters This step-by-step guide is a supplement to the subsection 3.2.2 in the easyAmber publication.
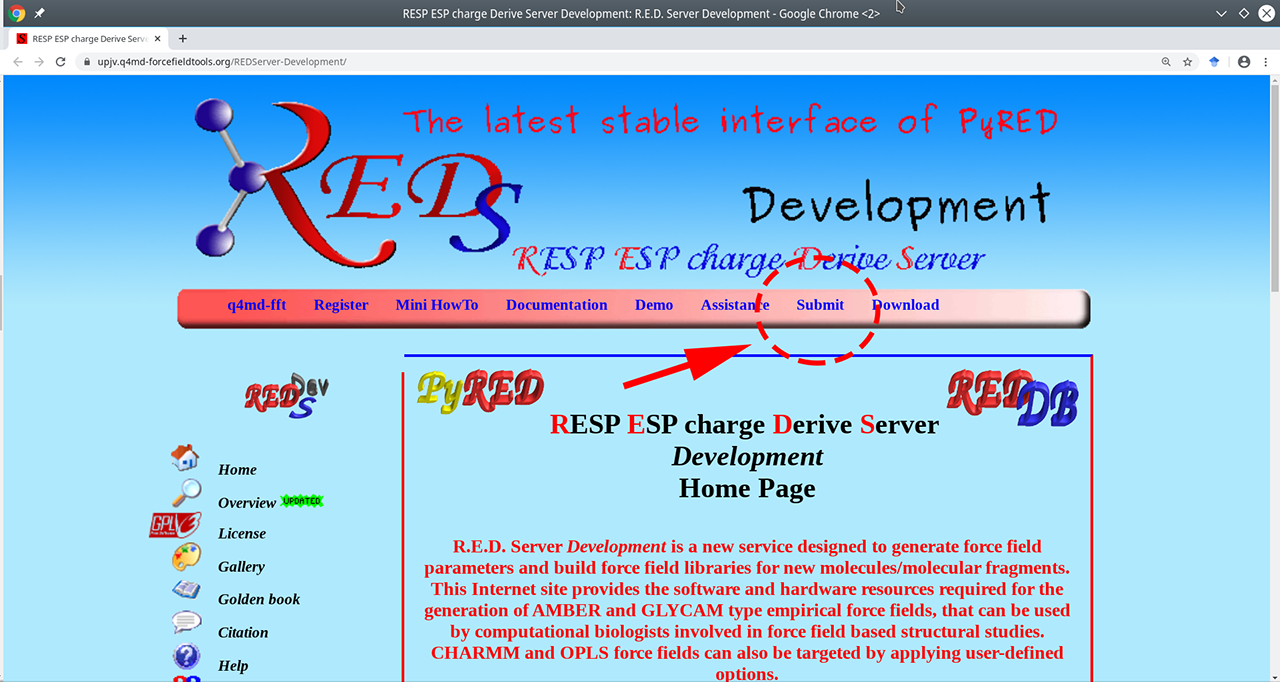
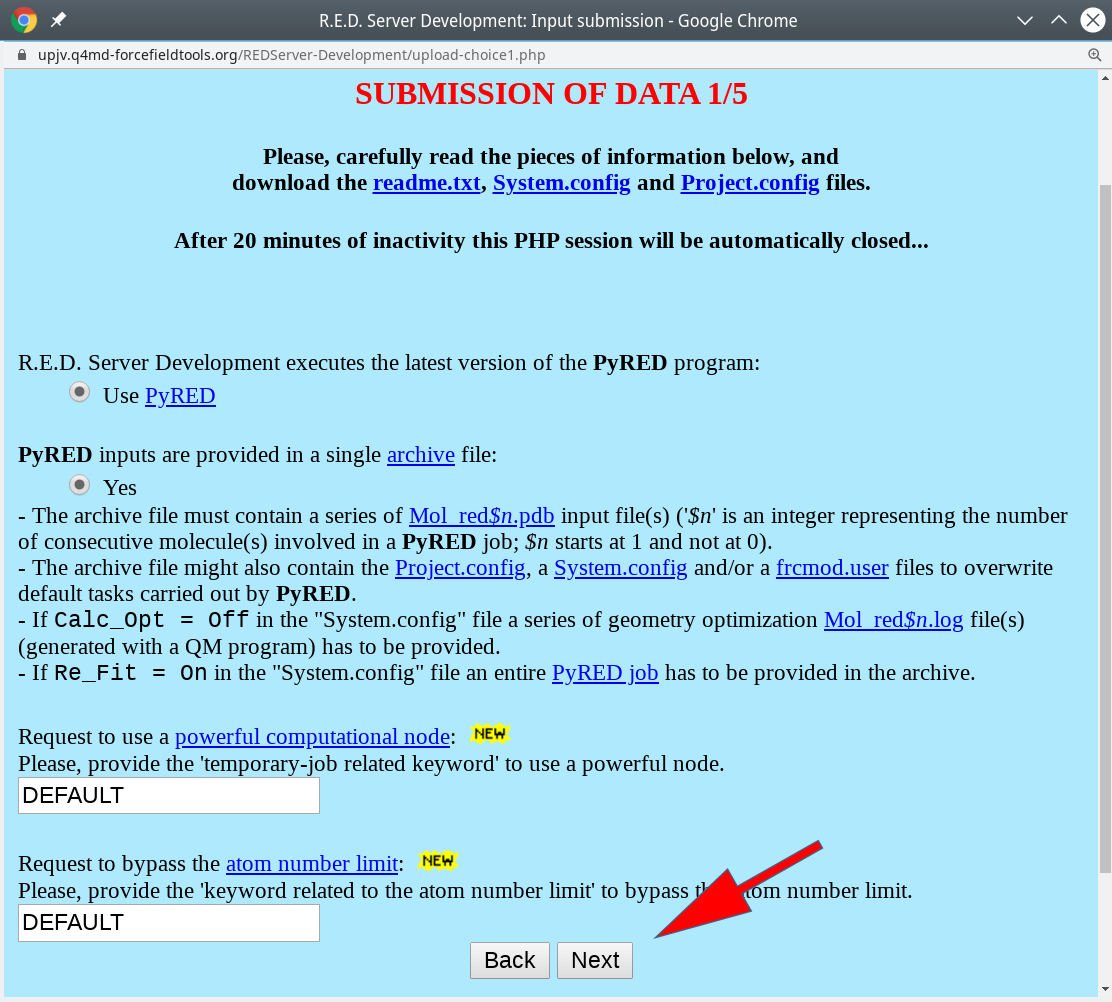
- Go to the R.E.D. web-server main page available at https://upjv.q4md-forcefieldtools.org/REDServer-Development/.
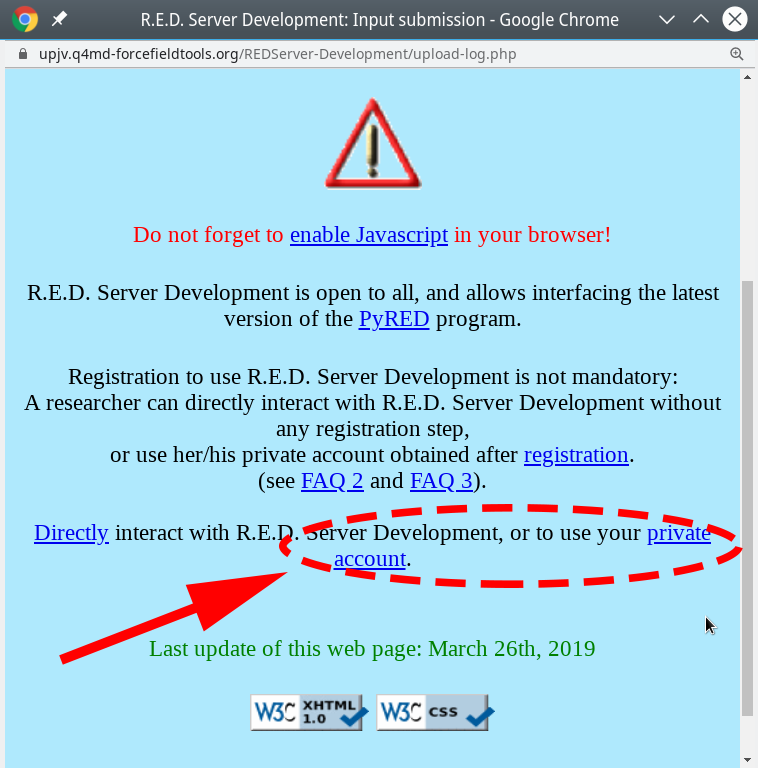
- Press the "Submit" button, then press the "Use your private account" link. You should register to facilitate further analysis.
- On the submission page of that server your should read the
readme.txtfile with the state-of-the-art instructions. In brief, create an archive with the input ligand in the PDB format and two text files with the parameter setup, and upload it to the web-server to perform the advanced geometry optimization and calculation of atomic charges, as further described below.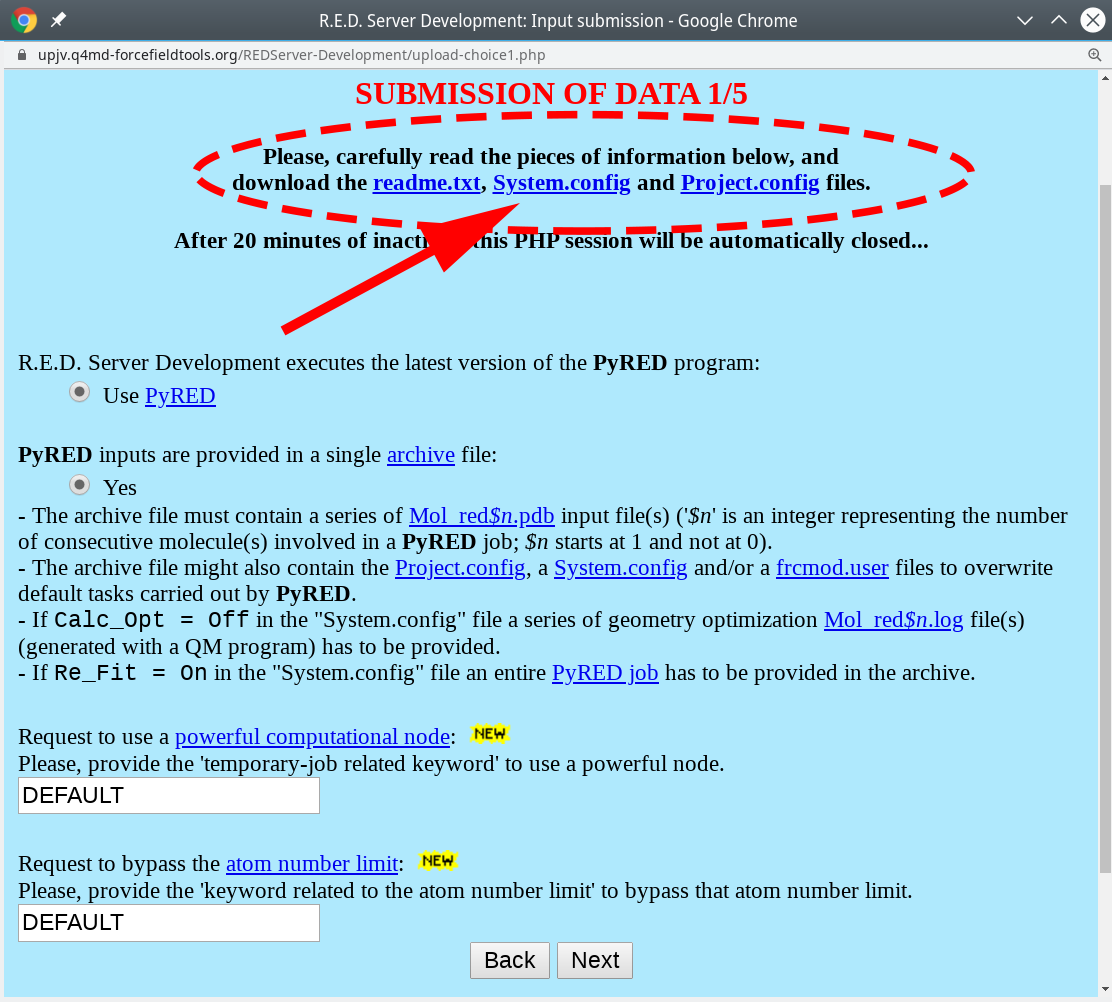
- Download the
Project.configfile (see above) and open it in a text editor to set the variableMOLECULE1-TOTCHARGEto the actual total charge value of the ligand (the defaul is zero, i.e., neutral). - You can download and edit the
System.configfile (see above) to change the default method to calculate atomic charges (i.e., RESP-A1). - Rename the file with ligand coordinated to
Mol_red1.pdb. - Finally, compress the three files into a
tar.gzarchive, i.e.:
tar czf red_task.tar.gz Mol_red1.pdb Project.config System.config
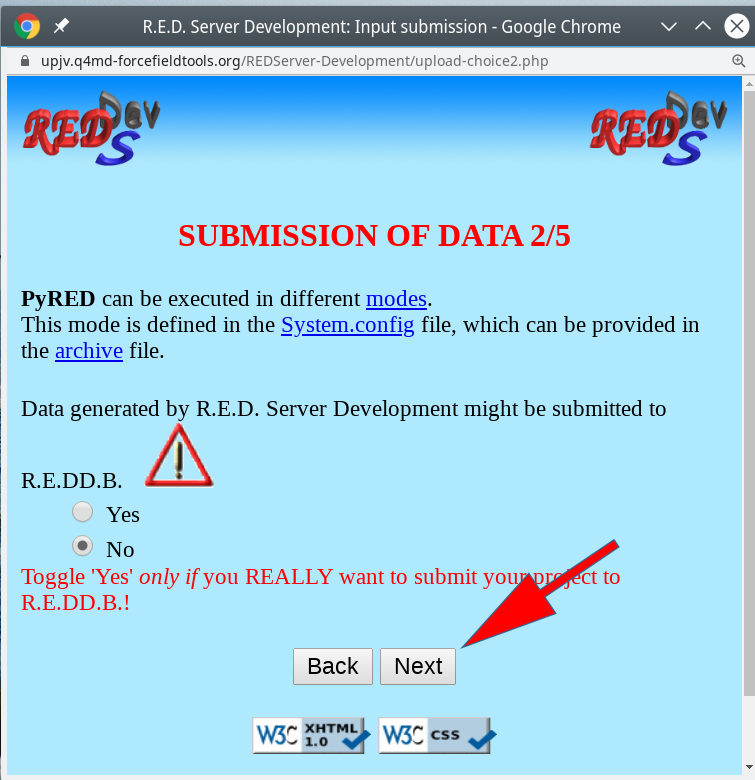
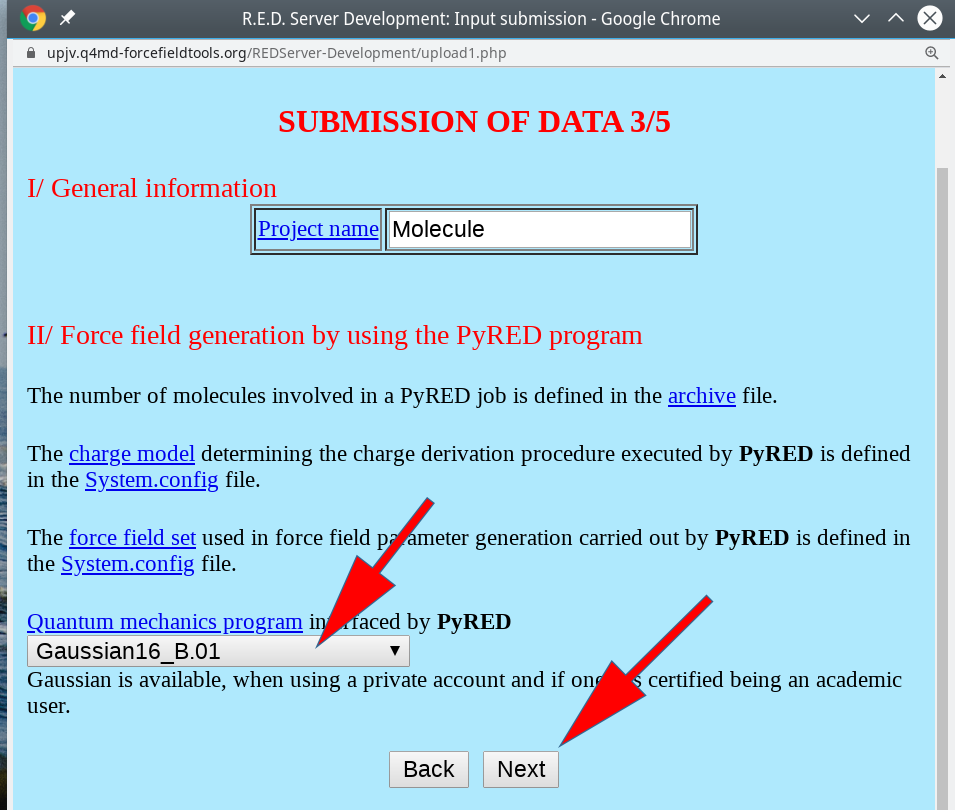
An example of a valid and ready-to-submit archive can be downloaded here. - Then, press "Next" three consecutive times to use the default settings (i.e., including the Gaussian16 utility).
- Upload the archive
red_task.tar.gzto the web-server, and finally submit the data for processing.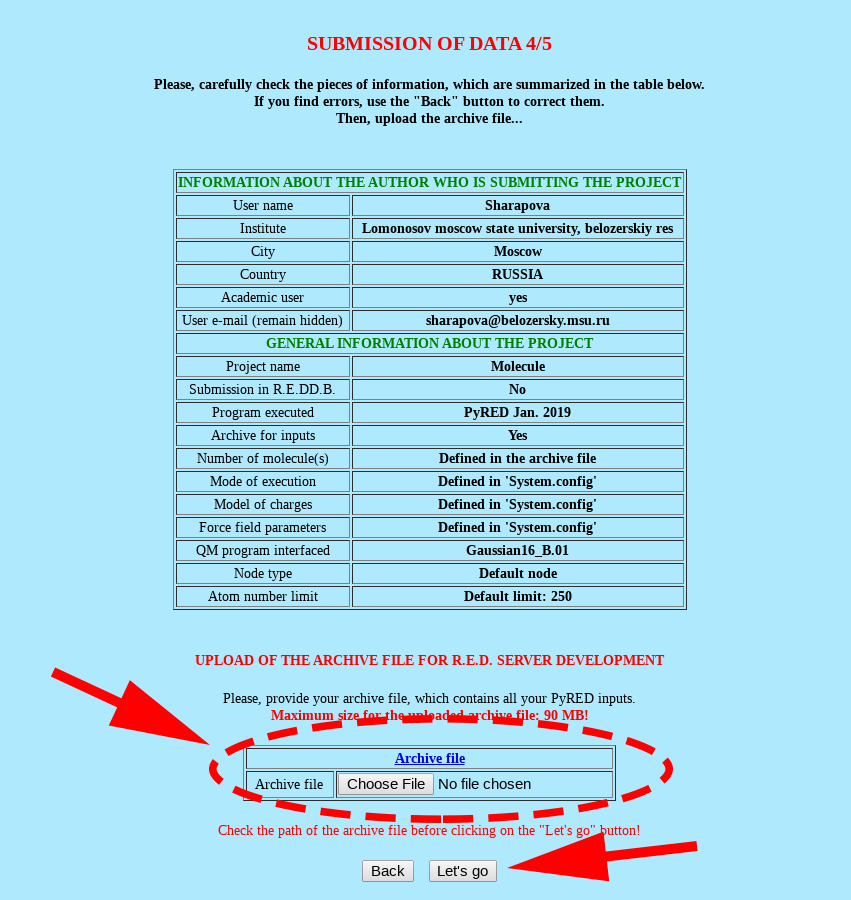
- Upon completion of your request, download the force-field library file
Mol_m1/Mol-sm_m1-c1.mol2using the dedicated link at the results page, or within the "Whole project" archive file. This MOL2 file contains the RESP-A1 charges calculated for each atom of the ligand. An example of such MOL2 file can be downloaded here.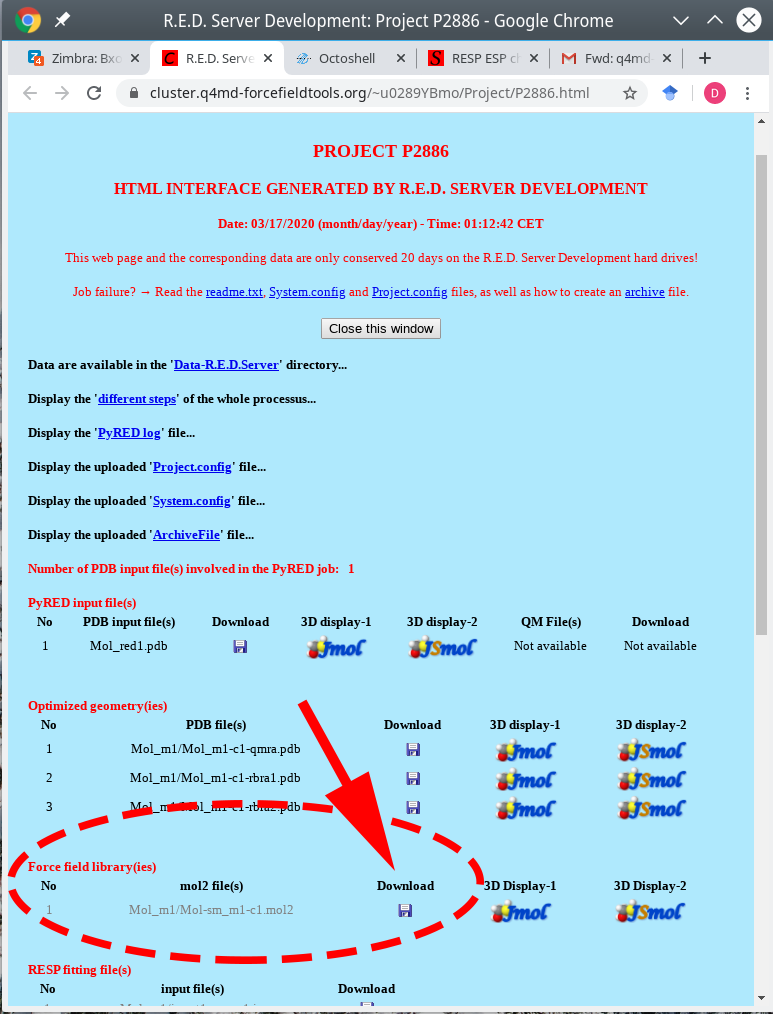
- Create a new folder named
AMBPAR_ligand_final. - Move the
Mol_m1/Mol-sm_m1-c1.mol2file (i.e., created by the R.E.D. web-server) to the new folderAMBPAR_ligand_final. - To collect the remaining Amber parameters for your ligand (i.e., atom types, bond lengths and angles, etc.) from the General Amber Force-Field run the following commands in the command-line:
antechamber -i Mol-sm_m1-c1.mol2 -fi mol2 \

	-o ligand_final_amber.mol2 -fo mol2 -at gaff -dr no parmchk -i ligand_final_amber.mol2 -f mol2 \

	-o ligand_final_amber.frcmod -a Y tleap -s -f leaprc.gaff

	> DRM = loadmol2 ligand_final_amber.mol2

	> saveoff DRM ligand_final_amber.lib

	> quit
When running the command within the tleap environment it is important to use the ligand name as in the filecomplex_final.pdb, e.g., theDRMstands for "doramapimod". - If finally successful, the
ligand_final_amber.lib,ligand_final_amber.frcmod, andligand_final_amber.mol2files will be created, as explained in the subsection 3.2.2 in the easyAmber publication. All intermediary files can be removed. - The created output data will be automatically picked up by the
automodel.plmaster script when building the full-atom molecular model of the protein-ligand complex in water (subsection 3.3 in the easyAmber publication).
[return to toc]
Naming rules for files and folders with user-prepared ligand topologies compatible with automodel.pl
The punch line of the easyAmber is the focus on workflow automation. In the spirit of this principle, the automodel.pl master script attempts to load ligand topologies automatically when constructing the molecular model, by searching all subfolders for files with '_amber' in their title and then ending with .lib, .frcmod, or .mol2 extension. Therefore, as a rule of thumb: (1) all files within the current project folder matching these regular expressions will be loaded into the LEAP for model building - thus, remove/rename all unnecessary files before running the automodel.pl; (2) for the user-created ligand topologies to be automatically picked up by the automodel.pl master script, the corresponding files should be placed in a separate subfolder (this step is not mandatory, but facilitates accurate file management and helps to avoid mess; the name of that subfolder can be anything) and re-named by adding the '_amber' right before the file extension, e.g., anyname_amber.mol2. You can change these naming rules by editing the automodel.pl script, as follows.
The code of the respective regular expression looks like this:
print "Info: Checking for ligands in the current folder and all subfolders\n";

my %ligands = ();

foreach my $file (@{rfiles("./")}) {

   if ($file !~ m/\.mol2$/ && $file !~ m/\.frcmod$/ && $file !~ m/\.lib$/) {next;}

   if ($file =~ /_amber\.mol2$/) {       my $filetitle = fileparse($file, ".mol2");

      $ligands{$filetitle}{"mol2"} = $file;

   }

   elsif ($file =~ /_amber\.frcmod$/) {

      my $filetitle = fileparse($file, ".frcmod");

      $ligands{$filetitle}{"frcmod"} = $file;

   }

   elsif ($file =~ /_amber\.lib$/) {

      my $filetitle = fileparse($file, ".lib");

      $ligands{$filetitle}{"lib"} = $file;

   }

}
[return to toc]
Define new covalent bonds
Definition of covalent bonds beyond the protein backbone can be loaded into the automodel.pl master-script using the bonds= command-line flag. In particular, the disulfide bridges will not be created automatically even if amino acid residues have already been renamed to CYX in the PDB. E.g., to create an S-S bond between Cysteines 318 and 335, set the respective residue names to CYX in the PDB file, and create a plain text file entitled SSBONDS.dat with the following content:
bond PROT.318.SG PROT.335.SG
Run the automodel.pl master-script with an additional command-line flag to load the new bond into the Leap utility:
automodel.pl input.pdb ... bonds=SS_BONDS.dat
Please note, that the residue numbering in Leap may differ from the original numbering in the PDB. To learn the new numbering load the PDB into the Leap utility (i.e., manually start tleap in the command line, then run PROT=loadpdb file.pdb) and use the desc command (i.e., desc PROT).
[return to toc]
Define new atom types
Definition of new atom types can be loaded into the automodel.pl master-script using the atoms= command-line flag. E.g., to accommodate AMBER parameters for phosphates introduced by Steinbrecher et al., you should create a plain text file entitled PO4_ATOMS.dat with the following content:
addAtomTypes {

{ "OP" "O" "sp3" }

{ "OQ" "O" "sp3" }

{ "OR" "O" "sp3" }

{ "OT" "O" "sp3" }

{ "OV" "O" "sp3" }

{ "OX" "O" "sp3" }

{ "OZ" "O" "sp3" }

}
Run the automodel.pl master-script with an additional command-line flag to load the new atom types into the Leap utility:
automodel.pl input.pdb ... atoms=PO4_ATOMS.dat
[return to toc]
Load auxiliary force-fields
Auxiliary force-fields can be loaded into the automodel.pl master-script using the ffmisc= command-line flag. E.g., to simulate a protein in complex with a linear oligosaccharide you would need to load a force-field for the protein (e.g., FF14SB) and the GLYCAM force-field for the ligand. First, you should edit the PDB file of the corresponding complex to ensure that atom names and residue names of your low-molecular-weight compound comply with the GLYCAM nomenclature. Then, create a plain text file entitled load_GLYCAM.txt with the following content:
source leaprc.GLYCAM_06j-1
Finally, run the automodel.pl master-script with an additional command-line flag to load the GLYCAM force-field into the Leap utility:
automodel.pl input.pdb ... ffmisc=load_GLYCAM.txt
[return to toc]
Using automodel.pl with polymer ligands
A "polymer ligand" is a molecule consisting of several regular parts, e.g., a polysaccharide. The official Advanced Amber Tutorial #27 describes the construction of the Polyethylene Terephthalate (PET) Polymer System. Such system contains the "head" monomer entitled "HPT", the "medium" monomer entitled "PET", and the "tail" monomer entitled "TPT". All three are structurally equivalent, but feature minor differences regarding a few chemical groups and thus must be considered as different "residue types". In brief, that tutorial provides three PREPI files with parameters for these three subligands. To build a particular polymer consisting of three "residues" you can use the following LEAP commands, assuming that pet.prepi, hpt.prepi, and tpt.prepi have been downloaded from the Advanced Amber Tutorial #27 to the current project folder:
source leaprc.gaff
loadamberprep pet.prepi

loadamberprep hpt.prepi

loadamberprep tpt.prepi

mol = sequence {HPT PET TPT}

savepdb mol pet3.pdb

quit
You can now dock the pet3.pdb file into your protein (or whatever is your particular interest with the polymer ligand). It is important to preserve the "residue" names (HPT, PET, TPT) and atom names (as in PREPI and the LEAP-generated PDB file) at all times. Now, to construct the AMBER model of this complex follow the guide below:
- Assuming that
pet.prepi,hpt.prepi, andtpt.prepihave been downloaded from the Advanced Amber Tutorial #27 to the current project folder, create a separate text file entitledpet3_params.datwith the following content:
loadamberprep pet.prepi

	loadamberprep hpt.prepi

loadamberprep tpt.prepi - Now, run the
automodel.plmaster script (i.e., the particular number of counter-ions, box size and force-field/water model type are provided as an example):
automodel.pl complex.pdb complex_amber.pdb ffmisc=pet3_params.dat na=11 cl=17 ff=ff15ipq water=spceb box=15 fastions=true - Now, once all three files describing your model are in place (i.e.,
complex_amber.prmtop,complex_amber.inpcrd, andcomplex_amber.pdb) you can finally run the MD simulation pipeline using theautorun.plscript:
autorun.pl complex_amber
[return to toc]
The autorun.pl protocol fails on the step #2
In some cases, the step #2 can fail with the following error:
ERROR: Calculation halted.

Periodic box dimensions have changed too much from their initial values.
In general, this does not imply any specific problem with your protein system, but rather is due to the inability of the GPU code (which is used by default) to automatically reorganize grid cells. A simple workaround would be to restart just this step #2 on a CPU build of the software. Use either of the two commands to run pmemd.MPI or sander.MPI (i.e., the results will be qualitatively the same, but pmemd.MPI is faster):
autorun.pl complex_amber pmemdmpi=true uselocalmpi=true

autorun.pl complex_amber sandermpi=true uselocalmpi=true cpu=4
Wait for the step #2 to complete, then press Ctrl-C to terminate, and finally restart on GPU using the regular command: autorun.pl complex_amber nofree=true This error should occur only once, i.e., on the step #2. If it emerges again at a later stage, this could indicate a more significant problem with your protein model.
[return to toc]
Running autorun.pl on a supercomputer
The autorun.pl utility can be used to execute the long-term MD simulations using the Slurm Workload Manager on a computing cluster or a supercomputer. This makes sense for the "production runs" of the conventional MD (step #6) and accelerated MD (step #7).
Each supercomputer system has its own unique hardware configuration. Below we provide several scenarios to accommodate the most common designs. If your configuration is not provided below, don't hesitate to send us a message with the details of the desired system configuration, and we will implement the corresponding solution into the autorun.pl master-script for everyone's benefit. You could also edit the autorun.pl master-script yourself to change the command used to query the Slurm manager.
Create a new task to run step #6 on a single GPU card of a single node in the queue compute:
autorun.pl dhfr_amber freeonly=true slurm=true gpunodes=1 queue=compute maxtime=3000 script=run
The following command will be automatically generated "under the hood" and actually used to query the Slurm workload manager:
sbatch -N 1 -p compute -t 3000 run /usr/local/amber18/bin/pmemd.cuda -i dhfr_amber.step6_free.conf -p dhfr_amber.prmtop -c dhfr_amber.step6_free.rst_bkp6 -o dhfr_amber.step6_free.out -r dhfr_amber.step6_free.rst -inf dhfr_amber.step6_free.mdinfo -x dhfr_amber.step6_free.nc
To add a queue name that is supported by your computing cluster open the script in the text editor, search for the "%cpu_per_node" hashtable at the top of the code, and add your queue by specifying the number of physical CPU cores per code, e.g.:
#Setup allowed cluster queues and number of CPUs per node my %cpu_per_node = ("yourqueue" => 12, "compute" => 14);
Create a new task to run step #6 on a four nodes with a single GPU per node in the queue compute:
autorun.pl dhfr_amber freeonly=true slurm=true gpunodes=4 queue=compute maxtime=3000 script=ompi
The following command will be automatically generated "under the hood" and actually used to query the Slurm workload manager:
sbatch -N 4 -p compute -t 3000 ompi /usr/local/amber18/bin/pmemd.cuda.MPI -i dhfr_amber.step6_free.conf -p dhfr_amber.prmtop -c dhfr_amber.step6_free.rst_bkp6 -o dhfr_amber.step6_free.out -r dhfr_amber.step6_free.rst -inf dhfr_amber.step6_free.mdinfo -x dhfr_amber.step6_free.nc
To add a queue name that is supported by your computing cluster open the script in the text editor, search for the "%cpu_per_node" hashtable at the top of the code, and add your queue by specifying the number of physical CPU cores per code, e.g.:
#Setup allowed cluster queues and number of CPUs per node my %cpu_per_node = ("yourqueue" => 12, "compute" => 14);
Create a new task to run step #6 on two GPU cards of a single node in the queue pascal:
autorun.pl dhfr_amber freeonly=true slurm=true gpunodes=1 queue=pascal maxtime=3000 script=ompi
The following command will be automatically generated "under the hood" and actually used to query the Slurm workload manager:
export CUDA_VISIBLE_DEVICES=0,1; sbatch -N 1 -n 2 -p pascal -t 3000 ompi /usr/local/amber18/bin/pmemd.cuda.MPI -i dhfr_amber.step6_free.conf -p dhfr_amber.prmtop -c dhfr_amber.step6_free.rst_bkp6 -o dhfr_amber.step6_free.out -r dhfr_amber.step6_free.rst -inf dhfr_amber.step6_free.mdinfo -x dhfr_amber.step6_free.nc
To add a queue name that is supported by your computing cluster with two GPU cards per node open the script in the text editor, search for the "%cpu_per_node" hashtable at the top of the code, and add your queue by specifying the number of physical CPU cores per code, e.g.:
#Setup allowed cluster queues and number of CPUs per node

my %cpu_per_node = ("yourqueue" => 12, "pascal" => 12);
Then search for the "%gpu_per_node" hashtable right below the previous one, and add your queue by specifying the number of GPUs per node, e.g.:
#Setup cluster queues with MULTIPLE Graphical processing units

# DO NOT APPEND QUEUE WITH SINGLE-GPU NODES !!!

my %gpu_per_node = ("pascal" => 2, "yourqueue" => 2);
Create a new task to run step #6 on two nodes with four GPU cards per node in the custom queue yourqueue:
First, add a new queue name that is supported by your cluster. Open the script in the text editor, search for the "%cpu_per_node" hashtable at the top of the code, and add your queue by specifying the number of physical CPU cores per code, e.g.:
#Setup allowed cluster queues and number of CPUs per node

my %cpu_per_node = ("yourqueue" => 12, "pascal" => 12);
Second, if your queue contains more than one GPU per node, search for the "%gpu_per_node" hashtable right below the previous one, and add your queue by specifying the number of GPUs per node, e.g.:
#Setup cluster queues with MULTIPLE Graphical processing units

# DO NOT APPEND QUEUE WITH SINGLE-GPU NODES !!! my %gpu_per_node = ("pascal" => 2, "yourqueue" => 4);
Finally, execute the command:
autorun.pl dhfr_amber freeonly=true slurm=true gpunodes=2 queue=yourqueue maxtime=3000 script=ompi
The following command will be automatically generated "under the hood" and actually used to query the Slurm workload manager:
export CUDA_VISIBLE_DEVICES=0,1,2,3; sbatch -N 2 -n 8 -p yourqueue -t 3000 ompi /usr/local/amber18/bin/pmemd.cuda.MPI -i dhfr_amber.step6_free.conf -p dhfr_amber.prmtop -c dhfr_amber.step6_free.rst_bkp6 -o dhfr_amber.step6_free.out -r dhfr_amber.step6_free.rst -inf dhfr_amber.step6_free.mdinfo -x dhfr_amber.step6_free.nc
Create a new task to run step #6 on a two nodes each equipped with a single 14-core CPU in the queue compute:
autorun.pl dhfr_amber freeonly=true slurm=true clustercpu=28 queue=compute maxtime=3000 script=ompi
The following command will be automatically generated "under the hood" and actually used to query the Slurm workload manager:
sbatch -N 2 --ntasks-per-node=14 -p compute -t 3000 ompi /usr/local/amber18/bin/pmemd.MPI -i dhfr_amber.step6_free.conf -p dhfr_amber.prmtop -c dhfr_amber.step6_free.rst_bkp6 -o dhfr_amber.step6_free.out -r dhfr_amber.step6_free.rst -inf dhfr_amber.step6_free.mdinfo -x dhfr_amber.step6_free.nc
To change the name of the queue or change the number of CPU-cores per node open the script in the text editor, search for the "%cpu_per_node" hashtable at the top of the code, and add your queue by specifying the number of physical CPU cores per code, e.g.:
#Setup allowed cluster queues and number of CPUs per node my %cpu_per_node = ("yourqueue" => 12, "pascal" => 12);
The following Slurm launch scripts are supported:
autorun.pl dhfr_amber script=ompi ...

autorun.pl dhfr_amber script=impi ...

autorun.pl dhfr_amber script=run ...
To set the uptime for your task to 10000 minutes use the dedicated flag:
autorun.pl dhfr_amber maxtime=10000 ...
To print the launch command to the run.sh script without actually trying to execute it (i.e., good for manual launch) use the dedicated flag:
autorun.pl dhfr_amber dummy=true ...
To run step #7 (accelerated MD) instead of step #6 (conventional MD):
autorun.pl dhfr_amber amdonly=true ...